Showing posts with label DIY. Show all posts
Showing posts with label DIY. Show all posts
Friday, May 29, 2020
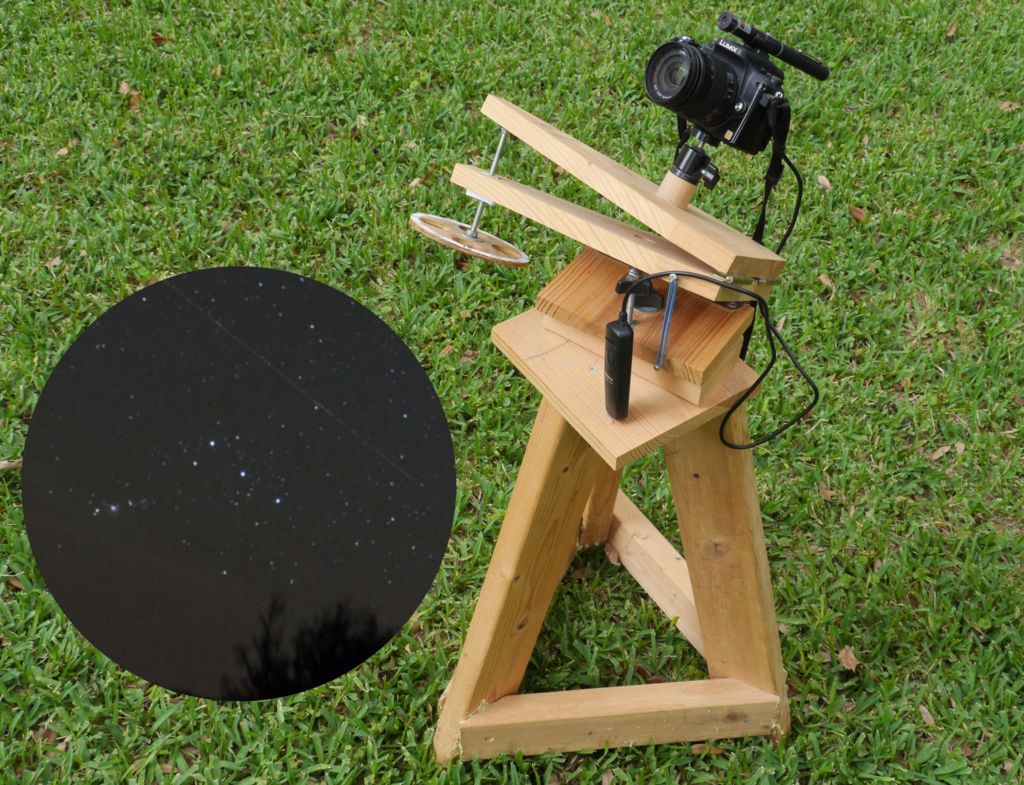
Barndoor tracker
My Instructable for a simple manual star tracker for astrophotography is now up (and a finalist in the Space contest). The idea is that you manually rotate a knob together in sync with a stopwatch to compensate for the earth's rotation. There is little that is innovative, except for the fact that I accidentally found that a carriage bolt head compensates for tangent error very nicely.
Friday, November 4, 2016
Laser collimator collimator
I've acquired a 3D printer (a used DaVinci 1.0a, hacked by the previous user to have custom firmware), and I've been having fun with it. I still don't have the ideal printing parameters figured out, and I'm learning how to design 3D solid objects.
 I've been finding graphical 3D design tools like Sketchup and Fusion 360 highly unintuitive--maybe with more practice I can improve--but I've also come across OpenSCAD where one uses a simple programming language to code shapes, and that is much more intuitive to me. Last night I designed and printed a super-simple collimator box for the laser collimator for my telescope. Rotating, drawing and dragging faces would have been a big nuisance, but it was a simple bit of code, and it's easily customizable for other dimensions of laser.

Monday, March 31, 2014
Reduce tangent error on Haig barndoor mount
Over the weekend, I made myself a simple hand-powered Haig barndoor mount with the standard 1 RPM dimensions (11.43" distance of bolt from hinges, 20 per inch thread). Not wanting to deal with hardware complication, I planned to do tangent correction in software (i.e., I made a simple Android app that shows where to turn the circle). But I noticed that when I put in all the parameters, the amount of tangent correction from my app was strangely small.
It turned out that a chance modification I made to the Haig design reduced tangent error quite a bit.
To save a few cents, instead of using an acorn nut on threaded rod, I used a carriage bolt's rounded head to bear on the upper surface of the mount. (Of course I filed and sanded the head for smoothness, by chucking the bolt into a drill press.) The cost of this modification was nil, and the amount of work was a few minutes of filing and sanding.
It turns out that the wide rounded head of the carriage bolt corrects tangent error quite a bit. Assuming that the threaded insert for the bolt is slightly countersunk (I didn't actually do this, but optimum performance would then be achieved) so that at minimum extension we get zero angle in the mount, tangent error after 10 minutes of operation is about one second of arc, versus seven seconds of arc for the standard mount.

And here's the mount.

Monday, April 1, 2013
Making a green laser pointer a little safer
I made my green laser pointer, which I use for showing things in the sky to friends, family and the public, a little bit safer by adding an IR block filter. Here are the instructions.

Thursday, April 5, 2012
Hard drive platter as flat mirror

I was just playing with looking at stars reflected in this platter through my 15x70 binoculars, with only one eye. There was some unidirectional glare from Venus, but stars looked pinpoint. I was only hand-holding the binoculars, so the test isn't great. And it would have been better if the central hole was blacked out. This isn't a very demanding test, higher magnification would be much better, but it's a promising start.
Sunday, April 1, 2012
Mars
I've never done very well with Mars, and my best views--never that good--have been with an aperture mask. With full aperture, I just get a red and white blob of chromatic aberration.
 I had a 75mm single-hole aperture mask that I was planning to use in my 8" F/4.5 Coulter for solar projection, but tonight I added another hole to it. Both holes miss the two-vane spider. The views of Mars with the aperture mask and a 5mm ortho are great--best I've had. Two dark areas (one was probably Mare Acidalium) and a bit of polar cap. I don't know if they're better with two holes than with one--there may be better contrast with one--but they are a bit brighter with two, and I love the easy focusing (with the mask, you see double and you focus by merging the images).

Saturday, February 25, 2012
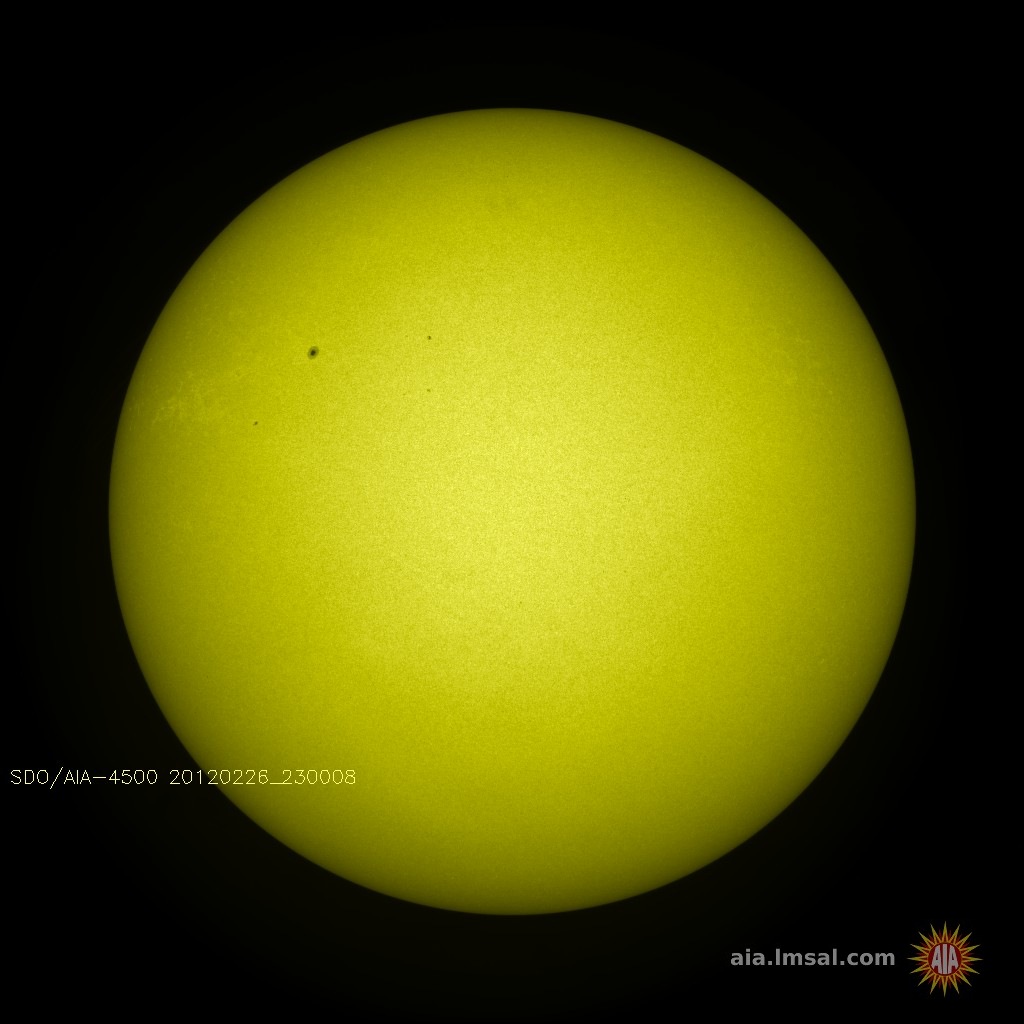
Solar projection scope prototype
Warning: With solar observing, be very careful not to look into the optical train, or you are likely to go blind. Do not leave the optics unattended. Watch for children! Don't let any critters walk into the optical path. Remember that as you experiment with the device, the optical path may be unpredictable.
I got the following lenses from Surplus Shed:
 I cut out holes in the shipping box and mounted the big lens to one side of it.
 Next, I cut a hole in a piece of plywood, and mounted the small lens in it, using pieces of an old bike inner tube to hold it in place. I added two pieces of wood to the bottom of the plywood for a stand.
 I had some used hard drive platters. I used a pair of cheap Harbor Freight helping hands to hold one of the platters as a heliostat mirror (using the alligator clip to hold the platter through a piece of cloth so it wouldn't mar the platter too much).
 I set up the optical train on the driveway. After some experimenting, I got it working. Hard drive platter reflects light into the big lens. About 80 inches further, the small lens stands. A couple of meters further away (I didn't measure; my calculations suggest 6.3 meters as the correct distance, but it seemed closer to me), in the shade, I have a box with a piece of card stock taped to the side as a projection screen.
 Result: Eight inch image of the sun. Acceptable chromatic aberration along edges. Moderately fuzzy. One clear sunspot. (Today's solar photo online showed a smaller sunspot near the larger one, and I did not see that.)
I got the following lenses from Surplus Shed:
- 150mm diameter PMN, 2600mm focal length (stock L3855D, $25)
- 68.7mm diameter NMN, -800mm focal length (stock L4380, $4)


Aiming hard drive platter to reflect the sun was easier than I expected. (At this point, the safety stuff becomes crucial--make sure the sunlight doesn't get focused in anybody's eyes. Likewise, make sure no animal walks into the optical train.) I could see a bright spot reflected from the platter. I moved the spot onto the big lens. I could then see an unfocused spot on the ground between the big lens and the small lens. I centered that spot on the small lens, and put the screen box to catch the image. I then moved the small lens to focus the image.

It should work for the transit of Venus. I hope it will get a bit sharper when I find a good way to collimate the setup, maybe with a laser. Right now the collimation was all eyeballed (on the other hand, this is very long focal length work, since I am only using a small portion of the 150mm lens since the platter doesn't give much illumination, so it's less crucial.) I also hope things will improve if align the optical train in such a way as to make the sun be closer to being at right angles to the mirror, which will increase the amount of the primary lens illuminated by the mirror.
At some point, I will try with a 3.5" diagonal instead of the platter, and if it makes a significant difference to quality, I may need to buy a mirror.
While one can no doubt be harmed if fairly well focused sunlight within the optical train hits the eye, it is worth noting that if the big lens is correctly pointed at the diverging lens, at no point in the optical train is there an image of the sun smaller than about 40mm, so the amount of heat concentration is not so great.
Sunday, November 13, 2011
Lightening my Coulter 8"
I've been using my 8" F/4.5 scope more, because I just haven't been having the energy to pull my 13" out.
The 8" weighs in at around 40 lbs. I wish it was lighter. I shifted the bearings a couple of months ago so it wouldn't need a counterweight at the bottom of the tube.
And today I finally cut out big triangular holes in the sides of the rocker box.
 I sketched out a template in Inkscape, and printed it out in three pieces (it didn't fit on an 8.5x11 sheet), glued them together, and transferred the locations to the wood with a punch. I used a 2.5" hole saw for the corners of the triangle, and joined them up with a jigsaw cut. It was my first time using my fancy (reconditioned) Bosch 1590 jigsaw. I was pretty pleased. I used a Bosch T234X blade. It cut the tough OSB very nicely, and pretty smoothly (though the hole saw smoked a lot and there was a lot of tearout). The dust blower wasn't strong enough to keep the cut line clear, which was unfortunate (since I was wearing a dust mask, I couldn't blow dust away). Then I painted the exposed wood (with an approximately 1:1:1 mix of acrylic black paint, Titebond II and water). The cut out portions weighed in at a total of about two pounds. Not a big difference, but I find that at around 40 lbs, every pound makes a difference.
The 8" weighs in at around 40 lbs. I wish it was lighter. I shifted the bearings a couple of months ago so it wouldn't need a counterweight at the bottom of the tube.
And today I finally cut out big triangular holes in the sides of the rocker box.

Wednesday, September 7, 2011

Thursday, August 25, 2011
Paper craft sundial

Monday, August 1, 2011
Instructables space contest
Instructables is running a space-related stuff contest with nice prizes. I posted photos of four of the projects I described in this blog, and I encourage any readers to post their own projects.
Saturday, January 29, 2011
A simple wooden Crayford-style focuser
My son wanted to build a telescope out of a mailing tube we had, so we bought a 70mm lens (300mm FL). The part of telescope making that I like the least is focuser-making. But I think I now have a Crayford-style design that is very easy to make. It is easier to make than my previous wooden Crayford and helical Crayford, and has about the complexity of my push-pull Crayford but works an order of magnitude better.
 It's a block of hardwood (cherry, from an old crib), 2.75"x2.75"x1" in dimensions. I used my drill press to drill out a 1.5" hole (A) in the middle for the 1.5" outer diameter aluminum focuser tube. I then drilled a second hole, 3/8" in diameter, all the way through from one side to the other (B), so that hole A and hole B would meet and overlap by 1/16". This second hole is for the focusing rod.
 Finally, I drilled two more holes from one side to meet up with hole B (C and D) for adjustment screws that press on the focusing rod through PTFE pads, and tapped them to fit the adjustment screws simply by forcing a screw into the wood. These PTFE pads (E) are small strips of 1/16" PTFE
 , bent into a C-shape, with the back of the C facing the adjustment screws.
 I purchased an 8" x 1" x 0.0045" strip of self-adhesive PTFE tape (F) on ebay from mousetape.com for about $3 shipped. I stuck a strip along one side of the focusing tube.
I then enlarged the 1.5" hole in the middle slightly. My method of doing this was to use a sanding drum mandrel in my drill press with a somewhat oversized sanding drum
 (which would stick out on both sides past the work piece), with the work piece resting on another piece of wood with a hole in it, which was on the drill press table. As a result, I could keep the work piece aligned at right angles to the sanding drum while moving it about so as to enlarge the hole. I enlarged the hole until it was about 1.56" in diameter. I then finished the exposed raw wood with Titebond II diluted with water and sanded. I stuck another strip of PTFE tape (G) inside the focuser hole, opposite where the focusing rod will go. Then I put it all together, and it worked just fine.
 Update 1: I added knobs. I had some oak circles from using a hole saw on some piece of oak some time ago, and after sanding them (by putting on a bolt and spinning with a drill against a sanding block), I press-fitted them on the focusing rod. If it starts slipping, I'll drill a hole through the rod and knob and put in a screw.
Thanks: I am grateful to John Wall for the idea of putting PTFE on the focuser tube.
Update 2: I just had a bit of trouble with the wooden thread for one of the adjustment screws getting stripped. Treating the hole with CA glue helped, though.

 And I added a screw on one end of the focuser tube as a stop, and I added a screw to hold the eyepiece. Because the focuser tube is only 2" long, so as not to compromise the length of movement, we drilled little depressions in the main block for the screws.
 Update 3: And here is a not-to-scale diagram of what the main holes in the block of wood look like.


I then enlarged the 1.5" hole in the middle slightly. My method of doing this was to use a sanding drum mandrel

Thanks: I am grateful to John Wall for the idea of putting PTFE on the focuser tube.
Update 2: I just had a bit of trouble with the wooden thread for one of the adjustment screws getting stripped. Treating the hole with CA glue helped, though.

 And I added a screw on one end of the focuser tube as a stop, and I added a screw to hold the eyepiece. Because the focuser tube is only 2" long, so as not to compromise the length of movement, we drilled little depressions in the main block for the screws.
Sunday, December 19, 2010
Red backlight keys on phone

My Treo 700P has keys that light up. One can turn that off, but then it's a nuisance to type things in. So I ordered a piece of Rubylith from ebay, about 8x11 in size. The lights come from little white LEDs on the same board that the dome switches are on. And I reddened the lights, as can be kind of seen in the photo.


I had to do two cleanup things. Two of the Rubylith pieces protruded close to a dome switch (bumps in the white plastic in the photos), and I snipped the ends with nail scissors. Also, I had accidentally dropped a Rubylith piece with glue on it, and so there was a glue spot on a dome switch. I was afraid this would harden, so I cleaned it up with acetone.
It all works. For some reason, the center of the five-way switch is not as clicky as it was, but it works. Also, the lights are a bit pinkish rather than deep red, but I am pretty happy. I rarely use a phone at a dark site, but sometimes I need to.
I was also going to make a screen overlay from the Rubylith, and I may still do that, but it blurs the image annoyingly, making small fonts hard to reed. I may eventually get a sheet of Roscolux medium red gel filter
Wednesday, December 8, 2010
Red trunk lights on the cheap

I still need to do this to the dome light. My reading of Texas law suggests that alas I am not allowed to do this for the puddle lights ("running board courtesy lights" must be amber or white--maybe this only applies if they're on while the car is going, but why take risks?), so when I go observing, I'll just put some tape over them.
The cost for the whole project was low. I had the 330 ohm resistors lying around for years (I think they're 1/4W; ideally, I should have used 390 ohm). I got the LEDs for about two cents a piece from Tayda Electronics.
There was one unexpected cost. I blew a fuse when removing the original bulb. Lesson: Keep the fuse disconnected when doing this, except when measuring stuff.
Subscribe to:
Posts (Atom)