Showing posts with label astrophotography. Show all posts
Showing posts with label astrophotography. Show all posts
Friday, May 29, 2020
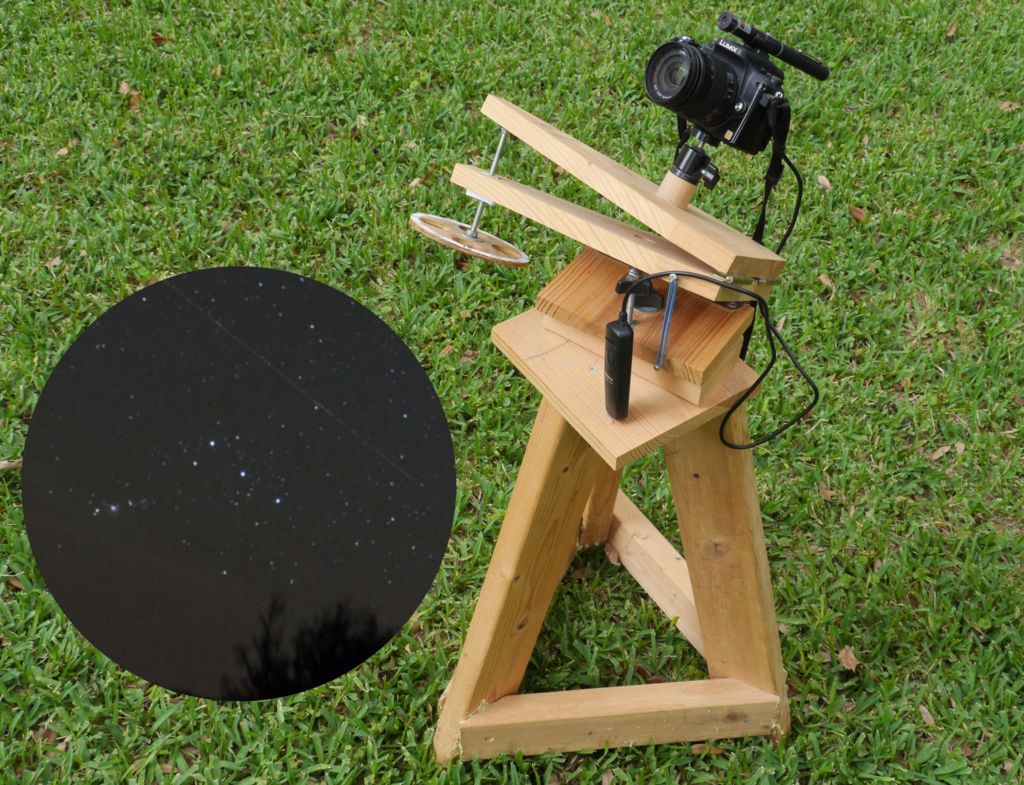
Barndoor tracker
My Instructable for a simple manual star tracker for astrophotography is now up (and a finalist in the Space contest). The idea is that you manually rotate a knob together in sync with a stopwatch to compensate for the earth's rotation. There is little that is innovative, except for the fact that I accidentally found that a carriage bolt head compensates for tangent error very nicely.


Saturday, April 19, 2014
AstroSurvey and AstroShare API

I initially made AstroSurvey to work with SkySafari. If you view a region of the sky in SkySafari and then launch AstroSurvey for SkySafari, it will show that region in AstroSurvey. You can also go the other way: browse the sky in AstroSurvey and then view the region in SkySafari (Menu, SkySafari View), though this feature may still be buggy (I've had it corrupt my SkySafari star brightness preferences in testing).
AstroSurvey is also designed to interface with other astronomy apps by supporting what I am calling the AstroShare API, which is an extension of the SkEye ACTION_VIEW API, with an extra "Size" field (Double, in radians) for the size of the field of view. So you can choose "AstroShare" in AstroSurvey and view the current field of view in any supporting astronomy app (right now SkEye is the only released one), and any supporting astronomy app can launch AstroSurvey. The next release of the Open Star Map port of Google Sky Map supports AstroShare as well.
AstroSurvey is basically a wrapper around the Android WebView which gets pointed to Aladin Lite (and imposes some patches for touch-screen devices). That's why the UI is not quite what you'd expect. I may eventually impose more patches and make a more Androidy UI.
Monday, March 31, 2014

Reduce tangent error on Haig barndoor mount
Over the weekend, I made myself a simple hand-powered Haig barndoor mount with the standard 1 RPM dimensions (11.43" distance of bolt from hinges, 20 per inch thread). Not wanting to deal with hardware complication, I planned to do tangent correction in software (i.e., I made a simple Android app that shows where to turn the circle). But I noticed that when I put in all the parameters, the amount of tangent correction from my app was strangely small.
It turned out that a chance modification I made to the Haig design reduced tangent error quite a bit.
To save a few cents, instead of using an acorn nut on threaded rod, I used a carriage bolt's rounded head to bear on the upper surface of the mount. (Of course I filed and sanded the head for smoothness, by chucking the bolt into a drill press.) The cost of this modification was nil, and the amount of work was a few minutes of filing and sanding.
It turns out that the wide rounded head of the carriage bolt corrects tangent error quite a bit. Assuming that the threaded insert for the bolt is slightly countersunk (I didn't actually do this, but optimum performance would then be achieved) so that at minimum extension we get zero angle in the mount, tangent error after 10 minutes of operation is about one second of arc, versus seven seconds of arc for the standard mount.

And here's the mount.

Sunday, October 6, 2013
Friday, July 12, 2013
More star trail removal
I now split the image into channels and ran the Richardson-Lucy deconvolution on each channel, and then re-merged the channels. Here's the before.


And after:

It's a bit bluish as I had DeconvolutionLab calculate the background separately for each channel and that wasn't ideal.
Wednesday, July 10, 2013
Removing star trails with Richardson-Lucy -- preliminary experiments
It's more fun to do things in software than hardware. Inspired by this, I had some luck removing star trails from unguided photography. I may post more detailed instructions later. You need to install ImageJ and the DeconvolutionLab plugin.
Here is what I did with Lyra.
Step 1 is to rotate the image, e.g., in Gimp or Photoshop, until the trails are all horizontal.


Here is what I did with Lyra.
Step 1 is to rotate the image, e.g., in Gimp or Photoshop, until the trails are all horizontal.

While doing this, identify the length of the tracks in pixels, in this case 20. Create an all-white 20x1 image. (I used ImageMagick, but a photo editor can also do it.) This image is the point spread function. Then run ImageJ. Then load both the 20x1 image and the rotated sky image. I made sure the sky image was the active image in ImageJ (click on it), and ran Plugins | DecompositionLab. Set the algorithm to Richardson-Lucy. In the Background module, set Subtract Background and Use minimal intensity to darken the sky. Run and here it is:

It's far from perfect but much better. Here's a before-and-after zoom. Note how nicely the double star was picked up.


Thursday, July 4, 2013
I need a barndoor mount
I need to make myself a barndoor mount. These star trails are annoying. Though I will play around with removing them by software as an alternative. This is Lyra.


Wednesday, July 3, 2013
Snapping pictures of the sky
I took my Panasonic DMC-G1 camera, set it on the widest setting, focused on something lit up in the distance, set it on manual, maximal aperture, 14mm setting on the 14-45mm lens, 30 second exposure, and put it upside down a table on our balcony. I was surprised how much more you see than with the naked eye. Here's the result (with the slightest bit of editing to crop and to darken the sky).
 That's Lyra at the bottom and Hercules in the middle. If you look really closely, you should be able to see M13:
 At 30 seconds, even at this low, low magnification, star trails start.


Tuesday, June 5, 2012
Transit of Venus
Here are some photos over the first 45 minutes or so. They are in sequence, but not evenly spaced in time.
This is from my 8" F/4.5 scope, stopped down to about 3", with photo taken hand-held with my Canon G7 camera off the projection funnel.

Here is the last photo in a larger size. The sunspots were very nicely visible in the funnel (I counted about 15), and I could even see two without a telescope in the #14 welder's glass. The photo doesn't do justice to the sunspots, especially the nice bright area that was just barely visible at the bottom of the disc.

This is from my 8" F/4.5 scope, stopped down to about 3", with photo taken hand-held with my Canon G7 camera off the projection funnel.

Here is the last photo in a larger size. The sunspots were very nicely visible in the funnel (I counted about 15), and I could even see two without a telescope in the #14 welder's glass. The photo doesn't do justice to the sunspots, especially the nice bright area that was just barely visible at the bottom of the disc.

Sunday, May 13, 2012
More sunspots
I still don't quite have the hang of photographing the projected solar image on my funnel--it's still sharper naked-eye--but the photos are improving. When the clouds aren't in the way.


Saturday, April 21, 2012


Saturday, September 3, 2011
Moon with webcam
While working on an Instructable for how to take pictures through a microscope, I was using a webcam (with lens removed) to take some pictures of the moon, shooting small video sequences and stacking them with Avi Stack. Conditions were imperfect, but it was fun.


Avi Stack generates photos like these from wobbly video like this:


Avi Stack generates photos like these from wobbly video like this:
Monday, May 9, 2011
Thursday, March 3, 2011
Monday, December 27, 2010
A 24" and an 8"
I went out last night to our club's observatory, and got to learn a bit of my way around controlling the observatory's 24" Ritchey-Chretien. My plan was to look at clusters in M31. I did all the observing in the 24" through the camera, with exposures from 5 to 200 seconds. I started with a very quick and shapely image of the spiral galaxy M74 that I didn't save. And M76, the Little Dumbbell, looked like its big cousin. I tried for a galaxy cluster, but at my exposure times I could barely see anything.
 Then I moved on to what I was primarily aiming at: the M31 clusters. I did see G1, G76, G78, G81 and G280. The hard part wasn't seeing the objects, but identifying them, as at the resolution of the camera I was using they all just looked like stars, as can be seen in my photo on the right, except maybe G1 (the bigger circles are just brighter stars). G1 has two stars from our galaxy really close to it and looks like the head of Mickey Mouse, with the stars being its ears, which made it easy to identify. The others I just had to correlate against SIMBAD images and the M31 clusters catalog in AstroInfo. Since AstroInfo only goes up to magnitude 12.7 in stars, there were very few stars in each camera field of view to correlate with, but I think I did manage to identify all the objects by their relative positions to these stars.
 I also looked at one open cluster in M31 for good measure: VDB0-B195D. It looked like it had some detail around the bottom edge, though the supposed detail may just be foreground Milky Way stars. The photo also captured NGC 206, a fragment of M31, and a bunch of prominent dark lanes in the M31 background. None of these are amazing photos--they're more like quick observing.
 I ended up my session on the 24" with a look at Comet Hartley, which I hadn't seen since earlier in the fall. It was fairly low in the sky, but it was definitely there (see glow to left of center). I was pleased that 2sky got its position correct.
I then went to the observing field to pick up my Coulter 8" which I had put out in the field at the beginning of the night. There was ice on the tube, but the scope worked great (except for a problem with the red dot finder that I need to fix). I had a quick look at M33. I couldn't see the spiral arms, but I did see hints of detail, and it was quite large. And then I looked at M42 and it had lovely color: greenish-blue near the Trapezium, moving to reddish-pink in the wings.
 Then I moved on to what I was primarily aiming at: the M31 clusters. I did see G1, G76, G78, G81 and G280. The hard part wasn't seeing the objects, but identifying them, as at the resolution of the camera I was using they all just looked like stars, as can be seen in my photo on the right, except maybe G1 (the bigger circles are just brighter stars). G1 has two stars from our galaxy really close to it and looks like the head of Mickey Mouse, with the stars being its ears, which made it easy to identify. The others I just had to correlate against SIMBAD images and the M31 clusters catalog in AstroInfo. Since AstroInfo only goes up to magnitude 12.7 in stars, there were very few stars in each camera field of view to correlate with, but I think I did manage to identify all the objects by their relative positions to these stars.

I then went to the observing field to pick up my Coulter 8" which I had put out in the field at the beginning of the night. There was ice on the tube, but the scope worked great (except for a problem with the red dot finder that I need to fix). I had a quick look at M33. I couldn't see the spiral arms, but I did see hints of detail, and it was quite large. And then I looked at M42 and it had lovely color: greenish-blue near the Trapezium, moving to reddish-pink in the wings.
Subscribe to:
Posts (Atom)